Webnative & Elm
Webnative is an effort from Fission to make building web applications easy and simple. The two most important changes here are, in my opinion, (a) you don’t need your own backend/server, and (b) the user fully owns their data, they take it with them from app to app.
Differentiation
Let’s talk about this first big change, not needing a server is a huge deal. If you’ve built a web application before, you can probably imagine how much time and pain this saves you. No APIs to code and no servers to manage (no devops, yay). It’s almost like a prototype that works out of the box.
To be clear, there is still a server component in here, for now. I say ‘for now’, because Fission aims to be fully decentralised. But, the technology isn’t there yet (web ecosystem), so, for now the server component will be the Fission web server. It’s open-source and you can host yourself if you want to.

Owning your data
I want to say this is the most important change, but less need for servers has a big impact on the environment, which is arguably more significant. Still, this brings a lot of benefits and possibilities to the table:
You actually own your data, no one can take it away from you. Disclaimer, Fission does have sensible restrictions on public content. But private, encrypted, content, is something not even Fission can touch.
Apps can reuse data. This is one of the pieces that brings a lot of possibilities. There’s a lot to discover here, but a few things I have in mind:
- Buy music in several stores/apps, play it in another app.
- Write a book in your favourite editor, distribute an ebook with another app.
- Manage your kitchen inventory in an app, the other one finds recipes matching with what you have in stock.
Having data portability opens new doors for people. If you’re missing a feature in an app, why not make an app yourself? Lots to experiment with, Fission is just getting started.
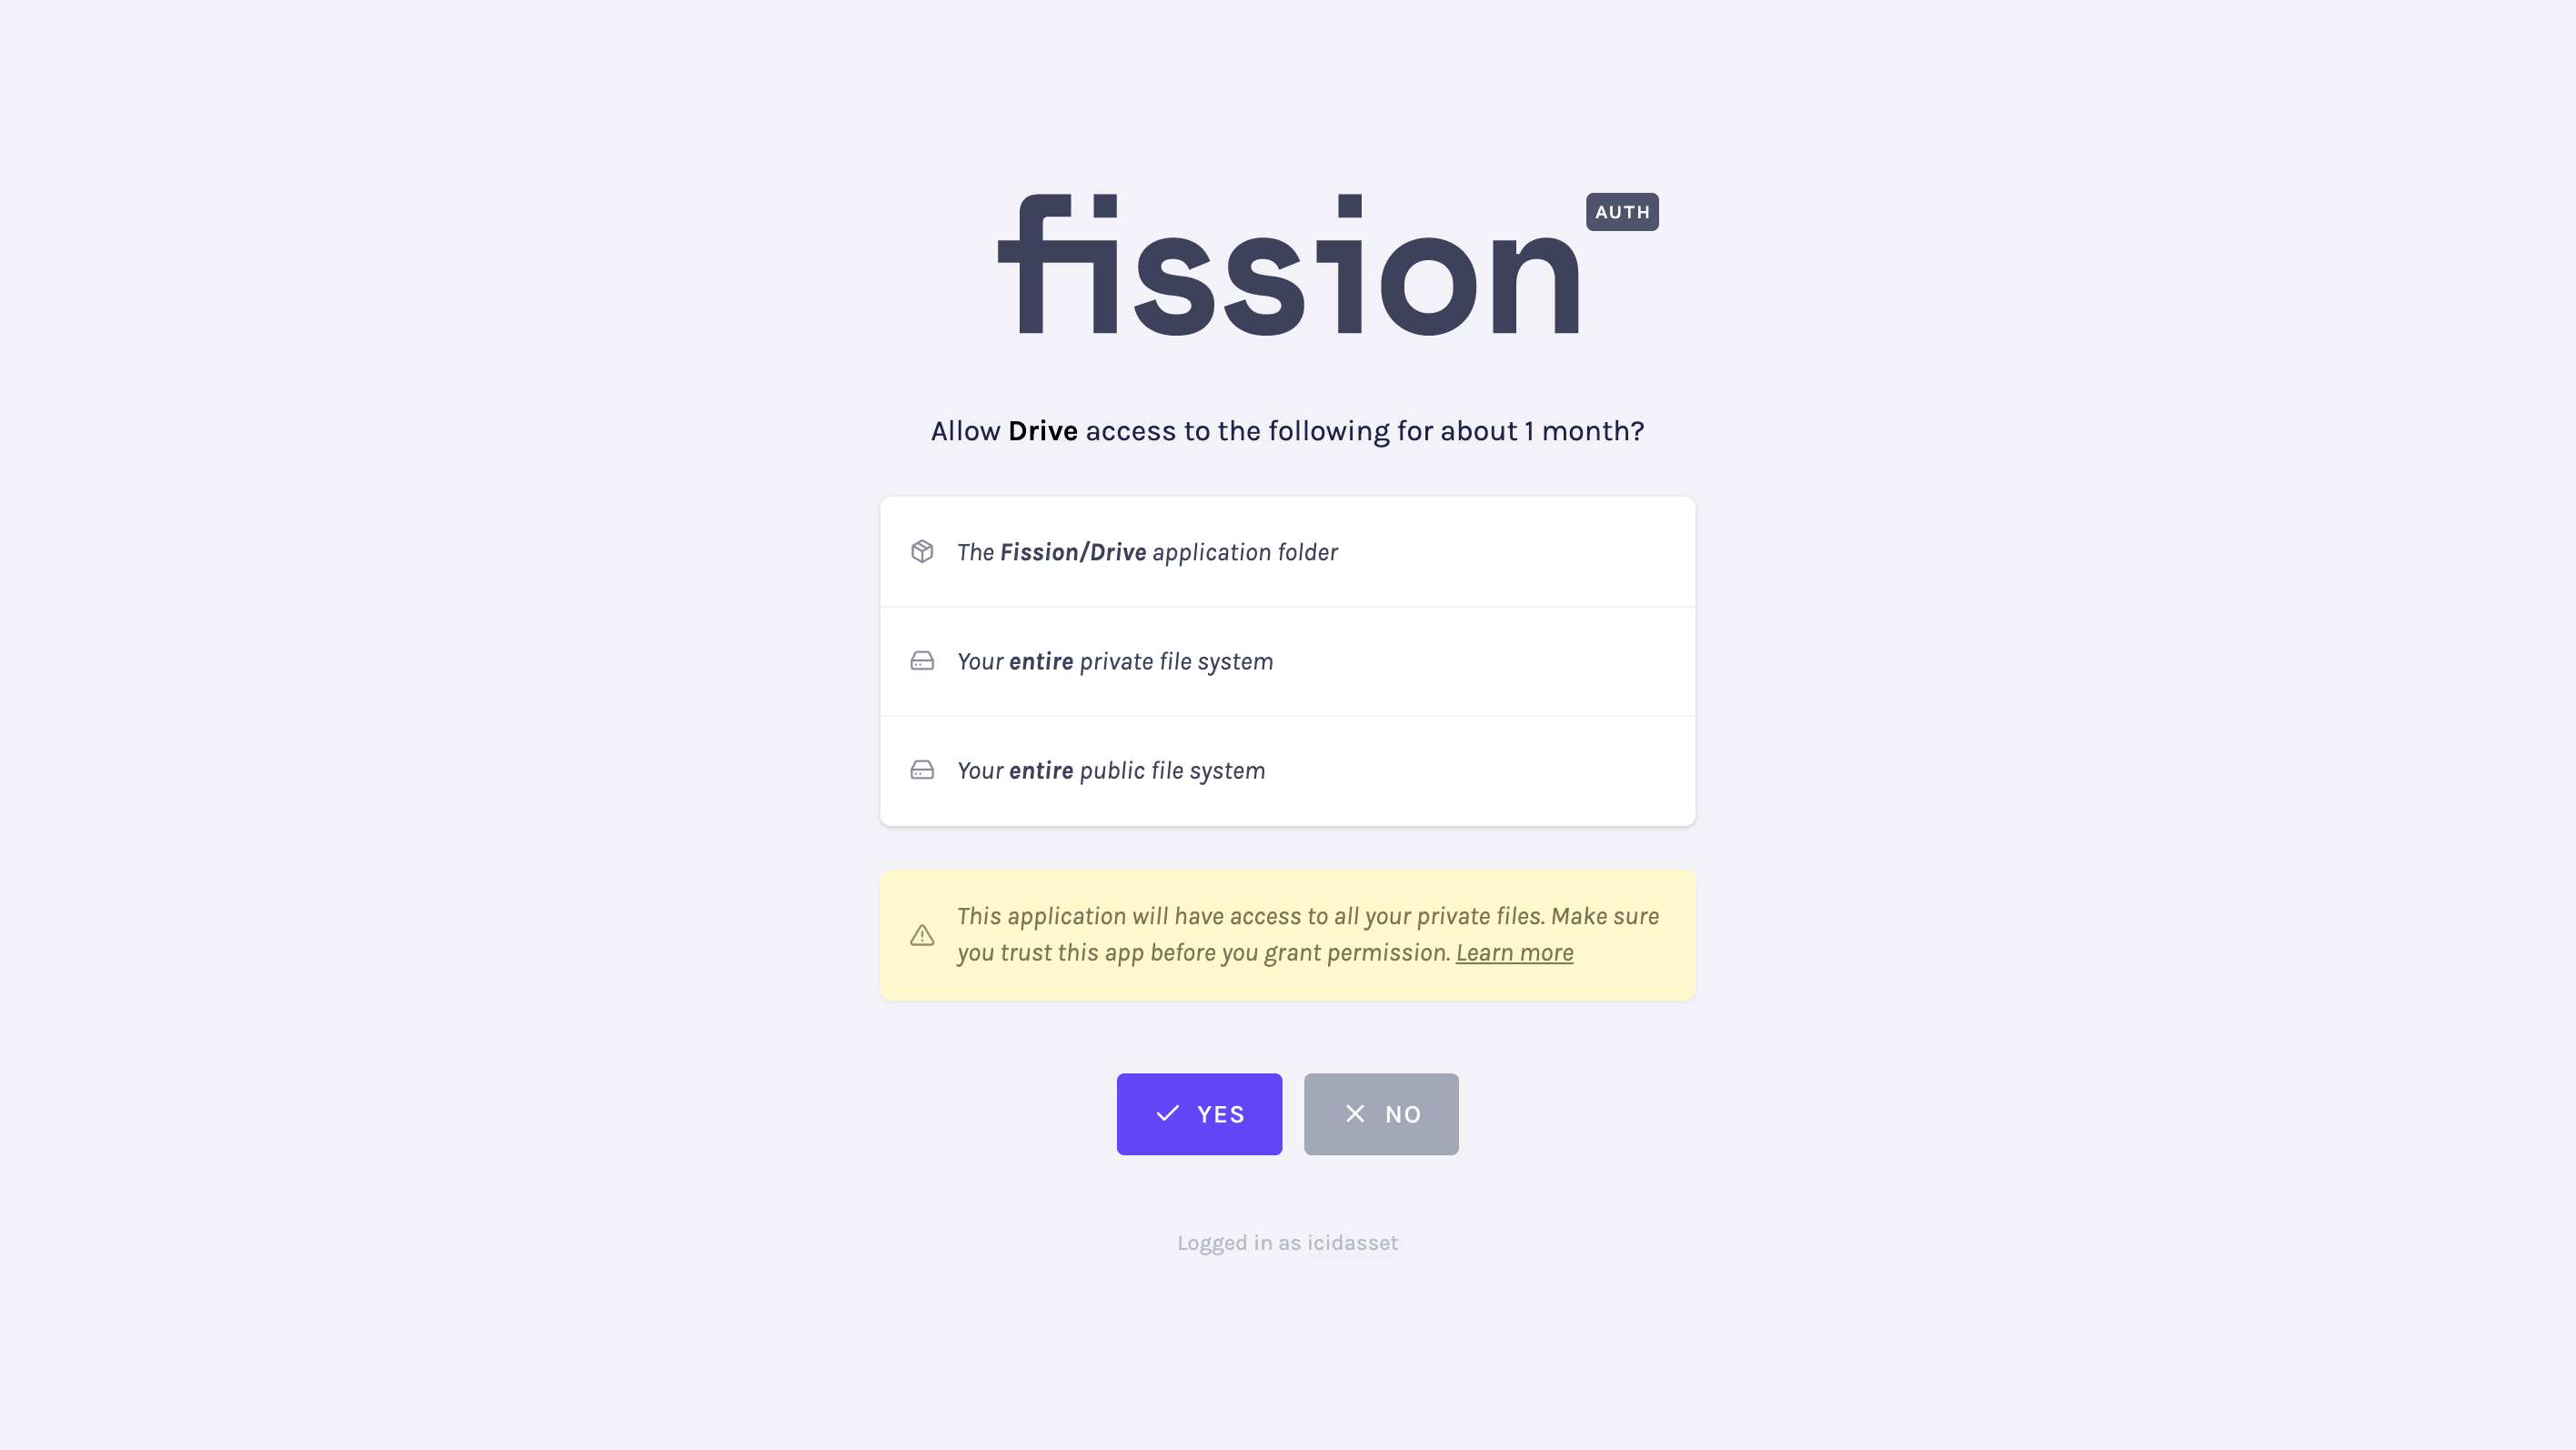
You give explicit permission to which data each app can access. This is done through the authentication lobby (also open-source), which serves as a safe haven. You can also use your own lobby, but there’s work to be done to make this a viable option.
Building your own app
Before we start coding there’s a few things to keep in mind:
-
Every app revolves around a filesystem. Most likely, in the current state of the webnative SDK, this will be the filesystem of the user that will use your app. For example, a user wants to use a todo-list app and grants access to the todo lists on their filesystem.
-
This technology is built upon content-addressable data. Namely IPFS. This isn’t required knowledge, but good to know, in case you want to experiment and understand the system better. IPFS allows for a content-addressable data layer, P2P communication and a local-first data strategy. In webnative you might notice a thing called a CID, that’s a content identifier, which is coming from IPFS. A CID is unique for each piece of data, if the content changes, the CID changes.
-
This is all very new. The webnative SDK hasn’t reached version
1.0, the interface could definitely be better. It’s being heavily worked on, any feedback is welcome.
Elm
This tutorial will use the Elm programming language, and assumes a basic knowledge of building an Elm application. In case you want to try out javascript library, take a look at the guide.
Resources:
- Elm package documentation
- Other Elm examples and more.
- RemoteData Elm package.
Getting Started
This is a package that uses ports heavily. Mostly because the webnative SDK relies heavily on the browser’s Web Crypto API and other browser APIs, for which there are no Elm interfaces. So our first task will be to install the Elm package and the javascript libraries, and setup some Elm ports.
elm install fission-suite/webnative-elm
npm install webnative-elm webnative
port module Ports exposing (..)

import Webnative

port webnativeRequest : Webnative.Request -> Cmd msg
port webnativeResponse : (Webnative.Response -> msg) -> Sub msg
We have two ports, one for outgoing request to webnative, and another for the responses to our requests. More on this later. Once we’ve defined those, we glue together our Elm app and webnative:
import * as webnativeElm from "webnative-elm"

// elmApp = Elm.Main.init()
webnativeElm.setup({ app: elmApp })
That’s it for the javascript side. Do keep in mind, if you’re using webnative-elm without a bundler, load the webnative library before webnative-elm.
<script src="https://unpkg.com/webnative@latest"></script>
<script src="https://unpkg.com/webnative-elm@latest"></script>
Permissions
Every app revolves around a user’s filesystem, for which we need to ask for permission to access their data. This is done through two types of permissions, app permissions and filesystem permissions. Where app permissions are just a shortcut to filesystem permissions, but serve to encourage good defaults.
import Webnative

appPermissions : Webnative.AppPermissions
appPermissions =
  { creator = "Steven Vandevelde"
  , name = "Diffuse"
  }
Asking for this permission will grant you access to /private/Apps/Steven Vandevelde/Diffuse/. This folder is located in the private section of the filesystem, under Apps, which is where we suggest to store application-specific data (good defaults).
This will be good enough to start out with, but if you want to achieve data interoperability, you’ll want to ask for filesystem permissions. For example, say a music management app wants to store playlists on the user’s filesystem. Another app could generate Youtube playlists from this.
import Webnative.Path as Path

filesystemPermissions : Webnative.FileSystemPermissions
filesystemPermissions =
  let
    playlists =
      Path.directory [ "Audio", "Music", "Playlists" ]
  in
  { private = [ playlists ]
  , public = [ playlists ]
  }
Once we have our permissions defined, we bring them together.
permissions : Webnative.Permissions
permissions =
  { app = Just appPermissions
  , fs = Just filesystemPermissions
  }
Initialise
Now that we know what to ask the user, we can put the infrastructure in place to ask for, manage and consume the data. I’ll continue with the playlists example. Lets set up some types first.
import RemoteData exposing (RemoteData(..)) -- krisajenkins/remotedata
import Webnative

-- 🔮 State to keep around
type Model =
  { userData : RemoteData { playlists : List Playlist }
  }

-- 📣 Each of these messages will be explained later
type Msg
  = AskForPermissions
  | GotWebnativeResponse Webnative.Response
  | ListPlaylists
When our application starts, we should initialise webnative as well. This does various things, such as loading the user’s filesystem, but more importantly, manage the permissions given by the user in the lobby. Webnative will consider us authenticated if we’ve received permission for everything we’ve asked for.
import Ports

init : flags -> ( Model, Cmd Msg )
init _ =
  ( { userData = Loading
    }
  , permissions
      |> Webnative.init
      |> Ports.webnativeRequest
  )
Because we’re dealing with ports we’ll need to listen for the response from webnative.
subscriptions : Model -> Sub Msg
subscriptions _ =
  Ports.webnativeResponse GotWebnativeResponse

update : Msg -> Model -> ( Model, Cmd Msg )
update msg model =
  case msg of
    GotWebnativeResponse response ->
      -- We'll assume for now that this is the response for `init`,
      -- we are not authenticated, and that everything was successfull.
      ( { model | userData = NotAsked }
      , Cmd.none
      )
The Lobby
We’ve got some core pieces in place now, it’s time to ask the user for permission. For this we’ll need to go to the auth lobby (authentication and authorisation).
askUserForPermissions : Webnative.Request
askUserForPermissions =
  Webnative.redirectToLobby
    -- Where the lobby should redirect to,
    -- after the user agreed to said permissions.
    Webnative.CurrentUrl
    -- Permissions to ask for (previously defined)
    permissions
When to do this exactly depends on the app. But, for simplicity’s sake, we’ll show a login screen if we haven’t got any userData.
view : Model -> Html Msg
view model =
  case model.userData of
    Loading ->
      Html.div
        []
        [ text "🍿 Initialising webnative and possibly loading the user's data" ]

    NotAsked ->
      Html.div
        [ Html.Events.onClick AskForPermissions ]
        [ text "Login" ]
Access Granted
Now that we’ve got access to the data, we can interact with the filesystem 👏 For this we’ll need the Wnfs module from the package. WNFS is short for Web Native File System. In this example we’ll load the private playlists from the folder we configured in the permissions.
import Webnative.Path as Path
import Wnfs exposing (Base(..))

listPrivatePlaylists : Webnative.Request
listPrivatePlaylists =
  Wnfs.ls Private
    { path = Path.directory [ "Audio", "Music", "Playlists" ]
    , tag = tagToString ListedPrivatePlaylists
    }
Those are the instructions for webnative. You’ll notice there’s an attribute called tag, this is needed to identify the filesystem response we get back from webnative. This could be as simple as:
module Tag exposing (..)

type Tag =
  ListedPrivatePlaylists

tagToString : Tag -> String
tagToString tag =
  case tag of
    ListedPrivatePlaylists -> "ListedPrivatePlaylists"

tagFromString : String -> Result String Tag
tagFromString string =
  case string
    "ListedPrivatePlaylists"  -> Ok ListedPrivatePlaylists
    _                         -> Err "Unknown tag"
To perform the filesystem request we use the webnativeRequest port again.
update msg model =
  case msg of
    ListPlaylists -> ( model, Ports.webnativeRequest listPrivatePlaylists )
Just as before, listen for the response from webnative. This time we’ll actually use the response though! Here you’ll use tags as well, see tagFromString.
import Webnative exposing (Artifact(..), DecodedResponse(..))
import Wnfs exposing (Artifact(..))

update msg model =
  case msg of
    GotWebnativeResponse response ->
      case Webnative.decodeResponse tagFromString response of

        -- The actual response to `init`
        Webnative ( Initialisation state ) ->
          if Webnative.isAuthenticated state then
            …
          else
            …

        -- Response to our `Wnfs.ls` request
        Wnfs ListedPrivatePlaylists (DirectoryContent list) ->
          List.map
            (\({ name } as entry) ->
              -- Playlist filename
            )
            list
To read a playlist, assuming a JSON file, we can do the following.
request = Wnfs.readUtf8
  Private
  { path = Path.file [ "Audio", "Music", "Playlists", "Chill Vibes Only.json" ]
  , tag = tagToString GotPlaylist
  }

update = case Webnative.decodeResponse … of
  Wnfs GotPlaylist (Utf8Content jsonString) ->
    Json.Decode.decodeString jsonString
Now there’s only one important piece of the filesystem puzzle left. Making filesystem changes and announcing them! We have to notify the Fission server that our filesystem’s changed, so our other devices get the changes too.
request = Wnfs.writeUtf8
  Private
  { path = Path.file [ "Audio", "Music", "Playlists", "Chill Vibes Only.json" ]
  , tag = tagToString SavedPlaylist
  }
  (playlistToJson playlist)

update = case Webnative.decodeResponse … of
  Wnfs SavedPlaylist NoArtifact ->
    -- 📡
    -- Our filesystem changed, notify Fission server.
    { tag = tagToString Notified }
      |> Wnfs.publish
      |> Ports.webnativeRequest
      |> Tuple.pair model
That’s pretty much it! You’ve used a portable filesystem in your browser 🔥🤯 Check out the documentation to see what else you can do with the filesystem. If you want to learn more about Fission and webnative, check out the Fission guide.
Existing apps
It’s early days, but here are some apps that use webnative.
Fission apps
- Drive, file manager.
Personal Projects
- Quotes, collect quotes.
- Herknen, todo lists.
- Diffuse, music player (doesn’t support playing from Fission yet).
Other apps
- Hyperdraft, writing & note taking.
- Emoji Log, habit tracker.
- Moon Forge, make music.
Future
I really want to see a future where the user truly owns their data, and can take it from app to app. Hopefully webnative is one of the ways we can achieve this. It’s still young, so some things we’ll have to wait on, such as:
- Announce filesystem changes automatically (near future)
- Conflict resolution (near future)
- Sharing private, encrypted, data with other people
- Data aggregation
- Batch operations
- Database interface (alternative to using JSON files)
- Federation